Watercolor Flowers in a Lightbulb - Procreate Tutorial
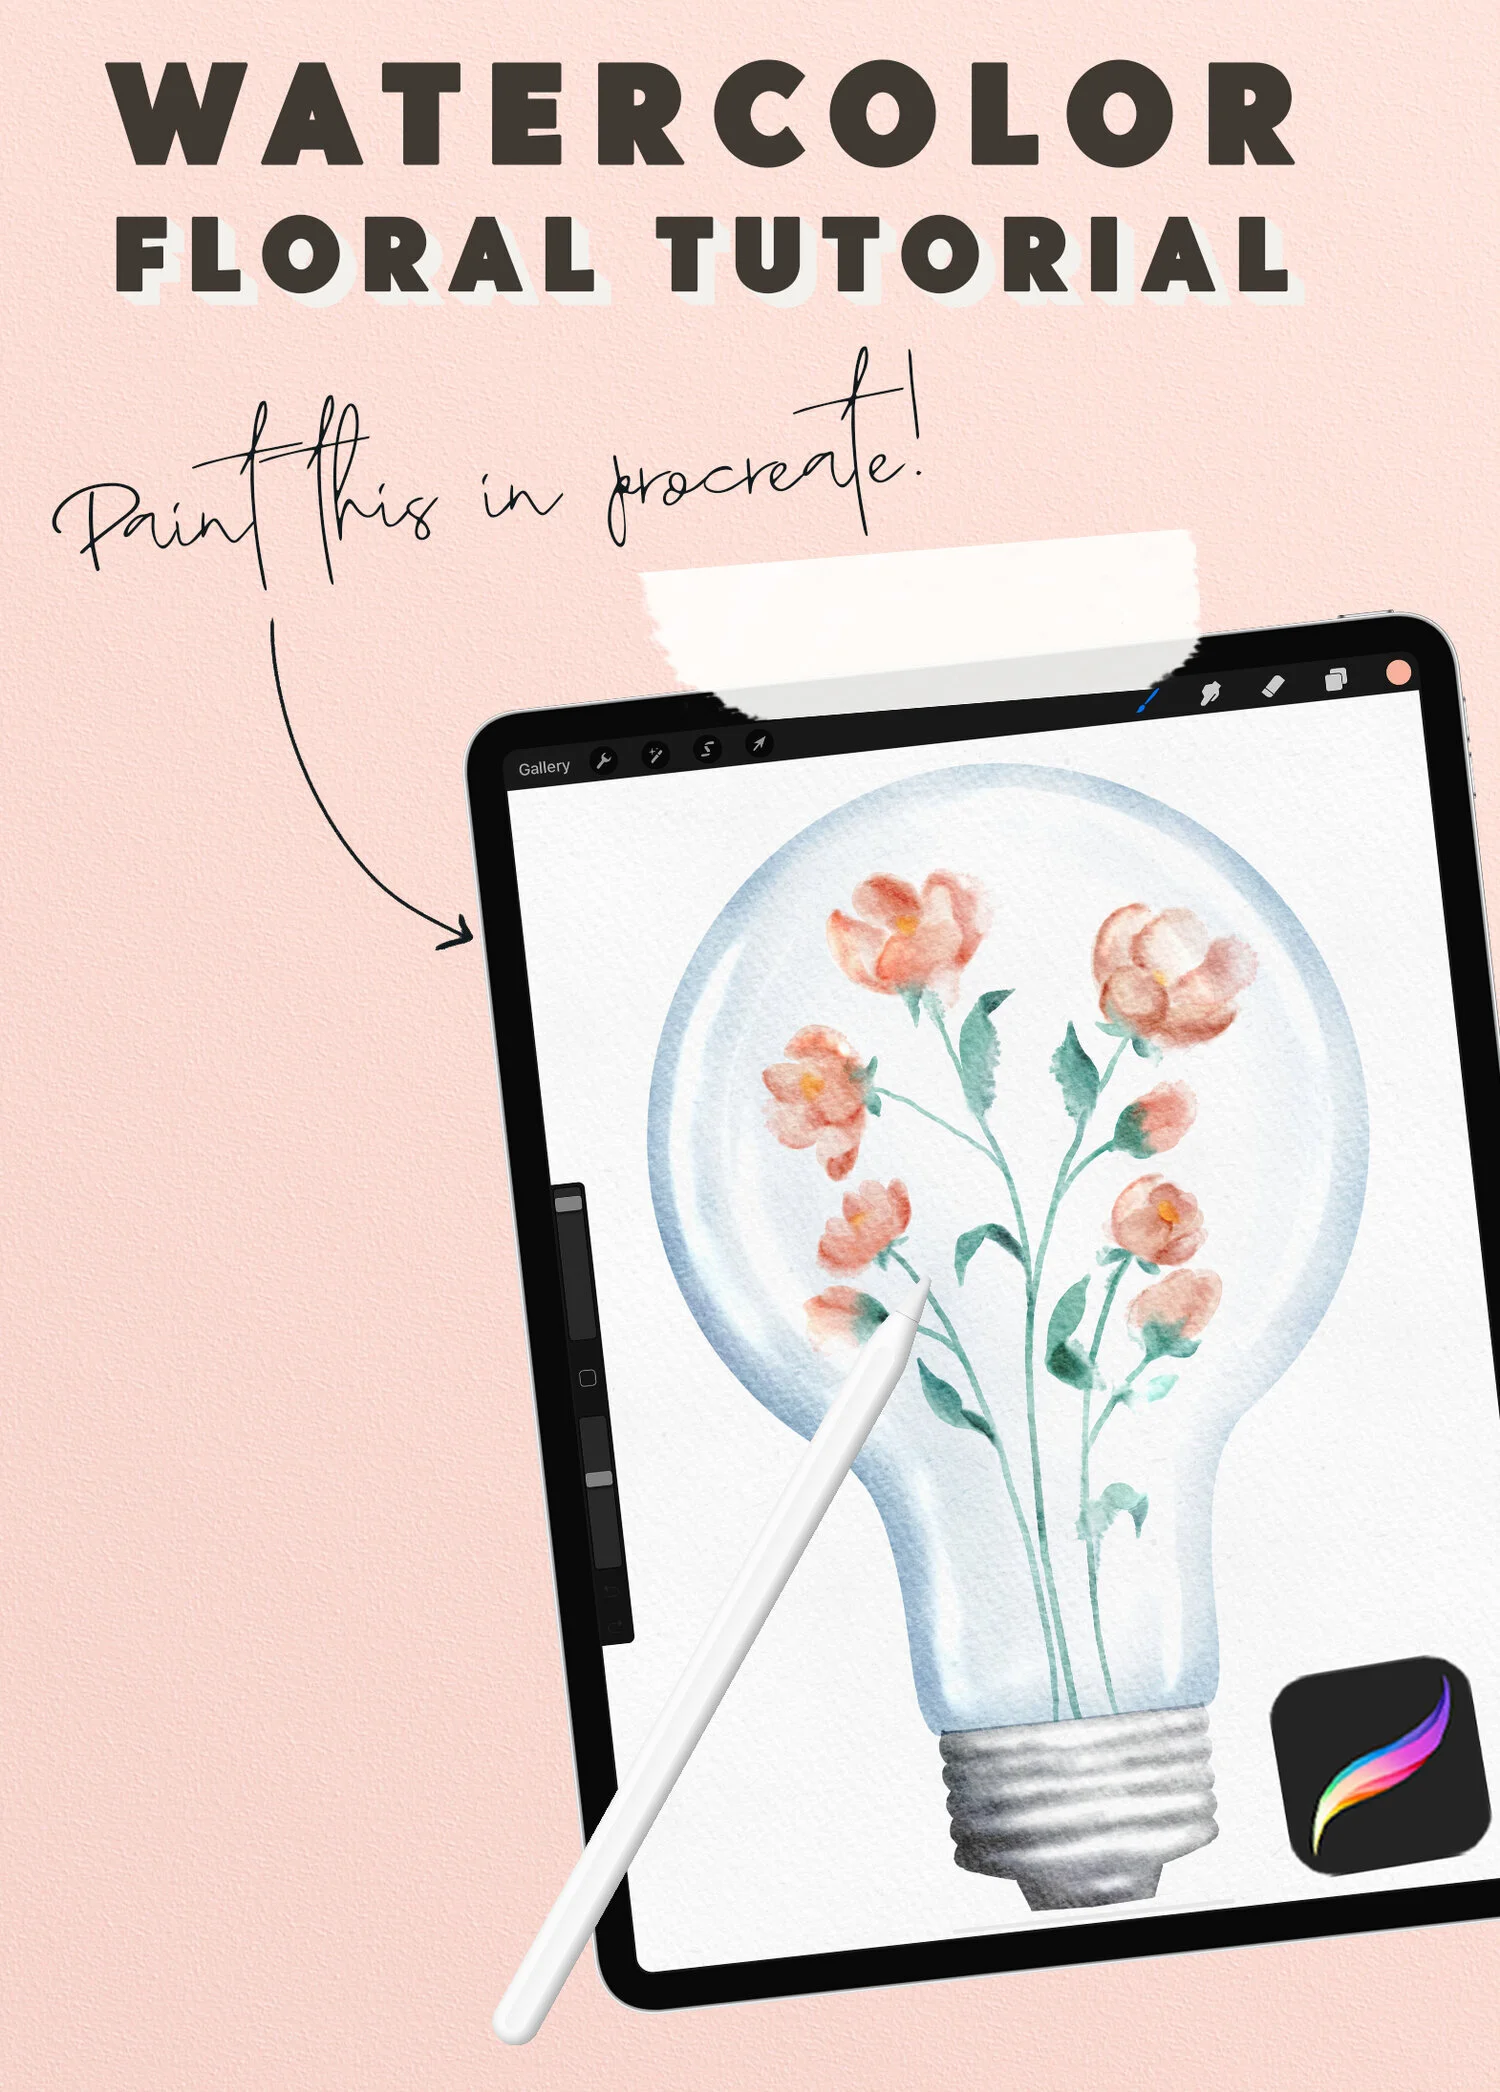
Want to paint some florals…with a twist? ;) Let’s learn to paint watercolor flowers in a lightbulb, in Procreate!
In today’s tutorial, we are going to walk through the exact steps to create this beautiful piece. This tutorial uses the Uproot Watercolor brushes, and mixes in some techniques from my tutorial on how to draw flowers. I cover some specific Procreate watercolor techniques, including smudging, getting darker, crisp edges, and recreating a blooming water bleed look.
BRUSHES USED
Monoline (Default Procreate Brush - Calligraphy Panel) - for drawing the base shape of the bulb
AN Push Down for Color - this brush builds up pigment really well and has soft edges
AN Sketch Pencil - for sketching the flowers.
AN Dark Edge Little brush - this is the main brush we'll use to draw the flowers and leaves, has a naturally darker edge, and is pressure sensitive so it responds really well for drawing leaves and petals.
AN Saturated Water Smudger - we'll be using this brush on the smudge tool to blend.
AN Blooming Cloud - this will help add some watery bleed effects at the end.
AN Watercolor Eraser - for opaque erasing.
AN Push Down for Water - for softer, transparent erasing.
It's highly recommended to use a paper texture if you're painting watercolor digitally; it makes a big difference in replicating the look. This is the Hand Pressed Paper that comes in the Everything Watercolor for Procreate Pack.
Form the BASE LAYERS
The first step is using these two bottom layers to draw a solid base shape, which will help keep the watercolor clean and contained. Use symmetry to draw these shapes to make it easier.
Follow these steps below to form the base layers:
Tap the wrench in the upper left corner, and then under Canvas, tap the drawing guide to enable it.
Tap "edit drawing guide" and select Symmetry. The default setting should place the symmetry line in the exact center of the canvas.
Tap Done, and in the layers panel, make sure that the layers say "assisted" - if not, tap to bring up the layer menu, and then select Drawing Assist to turn it on.
For these shapes, use the Monoline brush from the Calligraphy panel and select a solid black color to draw with.
Start by drawing a large arc shape.
Hold the pencil to the screen so that what you've drawn snaps to an arc or circle. If it extends almost to a full circle, that's okay. Just make sure that the line is smooth and rounded at the top. This should take up a large bit of the canvas - about half of the length of the canvas.
Next, draw a line downward for the base, connecting from the spherical part of the bulb, straightening slightly, and then flaring out just a tiny bit at the bottom edge.
Then close the shape.
Use the watercolor eraser to clean, if any lines are forming out.
Color drop to fill the shape. If, while color dropping, the color fills the entire canvas, adjust this by holding your pencil to the screen and sliding it to the left to decrease the color drop threshold.
Next, switch to the second base layer. Create these little arches for the threads of the bulb, and then close off the shape at the bottom. Then create the little electric dome at the bottom. Be sure to close off the shape by drawing a line across the top as well.
Now use Color Drop to fill these shapes.
Turn off the symmetry guide. Tap the drawing guide to turn it off, and then back in the layers panel, make sure that Drawing Assist is turned off on these layers as well.
While in the Layers panel, tap to bring up the side menu, and then tap Invert on both layers. This will change the color from black to white. Now it will function as a shape that we can select, to keep our watercolor crisp and contained.
COLOR THE LIGHTBULB
Now we get into the watercolor portion. . Follow these steps and color the lightbulb:-
To select the metal part of the bulb shape, tap the layer to bring up the menu and tap "select". You can also use a shortcut to do this, by pressing two fingers on the layer until the selection appears.
Move onto the "Bulb Metal" layer to paint the color. Use the Push Down for Color brush to start filling this in. This brush size is about 10%, and opacity is set at 10%. Use multiple strokes to build up shading on the outer edges and in the grooves of the threading. Add more pigment at the outside edges while the shape is selected gives it more of this real watercolor look.
Next, deselect the layer by tapping the selection icon up here. Back in the layers panel, select the upper bulb base shape layer, and then move to the Glass bulb layer to start painting. Use the lightest blue color.
Now increase the brush size to 20% and the brush opacity to 20%.
Starting at the outside edges, use light pressure to add a soft amount of color. Add a little more pigment on the lower left edges and the left side of the bulb for more shadow. A lot of these strokes are actually drawn outside the selection, which allows the color to gradually build up in a way that looks really natural. We’re defining the edge of the shape, but not adding too much color beyond the edges, to give it that appearance of transparent glass.
To add another shadow, increase the brush size to about 30% and opacity to about 30%, and use very light pressure to draw a shadow, to help emphasize the spherical bulb shape. This follows the curve of the outer edge shape. When we add in a highlight later, this shadow will help the light pop more.
To blend the shadow in, switch to the smudge tool, using the AN Saturated Water Smudger. This is on full opacity, and the brush size is set at about 40%. Use lots of small, short motions to tap and drag the shadow.
SKETCH THE FLOWERS
Now it's time to sketch our beautiful flowers:-
Choose a solid black and a sketch pencil. Don't worry about this part being perfect, this is just going to be a guide for our painting layers later.
Now draw straight lines for stems, following the shape of the bulb - narrow at the base, and then flaring out and splitting off at the top. Then, draw in ellipses to indicate the shape and perspective of the flowers. You can draw some teardrop shapes for flower buds, as well.
Once the sketch is all done - go into the Layers panel and decrease the opacity. You can do this by tapping here on the “LB” to bring up the slider, or as a shortcut, use two fingers to tap once on the layer. This brings up a slider bar at the top of the screen, and you can drag the pencil from right to left to decrease it. Set this at about 25%.
PAINT THE FLOWERS
Time to paint in these flowers that are from the sketch!:
Starting with a more saturated pink, use the Dark Edge Little brush to draw the petals. Set the brush on full opacity, and the size between 5 and 10%.
Draw in the petals, following the shapes indicated in the sketch. These are looser florals, so while you want the shapes to follow the sketch, the petals can still be pretty messy. Layer in some pigment to help add definition to these. To add more color, use the Push Down for Color brush, with opacity set at 50% and the size set at about 2%. Apply moderate pressure to paint these strokes, to replicate some of the happy accidents that are achieved in real watercolor
Switch to the smudge tool, use the Saturated Water Smudger to make the color addition more gradual. Just like when painting the bulb, small and short strokes here help pull the pigment in the direction of the brush.
Continue to paint the rest of the flowers, following this method: use the main paint brush (in my case, the Dark Edge little brush) to paint the petals, changing to the Push Down for Color brush to layer in more color in some of the petals, and then finally, use the Smudge tool to blend the colors and any overlapping brush strokes to make the color change look more gradual. Switch between a couple of different pinks for some extra variation.
*It's not super important to follow the shapes you drew perfectly. The main point of the sketch is to help understand the overall shape of the flower - but don't be confined to it.
After the petals are all drawn, pick a yellow to add in a center to the open flowers. You want this color to pop, so you could use the eraser tool (set on the Push Down for Water brush) to remove just a bit of the pink where you would add the yellow center. Then, with the Push Down for Color brush set to 50% opacity, at a size of about 3%, add in a tiny bit of this yellow. Switch to the smudge tool, blend this into the pink for a watery effect.
PAINT THE GREENERY
Now switch to the Greenery layer, and select your main watercolor brush. Set to 100% opacity, and the size set to 4%. Following the sketch, paint in the stems and leaves.
Once this is done, hide the sketch layer- we're done with that now. And then select the layer contents of the greenery by holding two fingers on the layer until the selection appears. Use the smudge tool blend in any overlapping strokes. You can also use this opportunity to add some more natural-looking color variation - lighten areas up by starting a brushstroke outside of the selection, moving into the selection. Darken areas by adding color - Use the Push Down for Color brush to layer in some pigment where the leaves are turned and folded. Be sure to use the smudge tool to blend any areas that need to look more gradual.
Now, this is what we have so far.
BLEND TOGETHER & ADD EFFECTS
To clean up and define the colors a little more:-
Select the layer contents of the Greenery layer once more.
Once the selection appears, go into the flowers layer, and use three fingers to scrub the screen. This will clear the selected contents from the flowers - effectively, removing the overlap of the colors.
Next, in the layers panel, select both the flowers and the greenery layers by tapping each layer and pulling slightly to the right.
Pinch to merge these together.
With the smudge tool, pull the green slightly into the flowers where they meet. This is going to replicate a realistic watercolor look, where the colors bleed together slightly. Also soften some of the edges of the leaves and petals throughout the piece to add in some of the randomosity of more flooded watercolor.
To help add to this realism, use the Blooming Cloud brush to accentuate these areas, on the same green used on the leaves. This brush is set at 50% opacity, and the size is at around 12%. This is a directional brush, so one edge is darker, and the other is softer and lighter. So with this, draw in a clockwise direction to make sure the darker edge is on the outside. This might seem a little confusing, but really, it becomes intuitive when you're using the brush.
Add HIGHLIGHT
Go into the Layers panel.
On the Highlight layer, tap the LB to open the layer blend modes.
Scroll down to ADD.
Then, pick a solid white, and switch to the Push Down for Color brush. Keep the opacity set to 50%, and the size to about 13%.
Draw a circle that is slightly smaller than the size of the lightbulb. Hold the pencil to the screen so it snaps into shape, and then release, and tap Edit Shape at the top to reposition it. Tap outside of the shape to keep these changes and keep painting. Now, following the margin of the circle, draw the rest of the highlight on the lower portion of the bulb.
Reduce the brush size to 6% and opacity to 20%, and use light pressure to draw lines to highlight the threading of the metal. Keep these highlights toward the center-right.
Now, switch to the eraser tool, set on the Push Down for Water brush. Set the size to around 20% and the opacity to about 50%. Starting at the center of the bulb, use light pressure to fade the highlight. Then, do the same on the outer edge of the highlight to soften the edge. Reduce the size and the opacity if you feel that it is removing too much of the highlight too quickly.
Switch back to the brush, still set at the smaller size, to add in a curved highlight on the left side of the bulb, insert slightly toward the middle. Use the eraser to soften this highlight as well.
And that's it! You have mastered painting watercolor flowers in a lightbulb.
This was a fun twist on florals, and I think painting glass might be a new obsession of mine! Hope you enjoy - happy painting!
Get the color palette from this video!

JOIN THE PACK
When you join, you'll gain access to dozens of Procreate freebies: brushes, paper textures, workbooks, and color palettes. I send out weekly updates with my best tips and tricks, and you'll be the first to hear when new freebies are released!